Docker basics for beginners...

Hi, I am Ritesh a Software Developer. I write blog on web development and basically all that I love 😎.
Introduction
If you search for Docker, you'll discover it's a software platform that employs OS-level virtualization to produce self-sufficient containers.
Let me break it down in simple terms.
Perhaps you've set up several Virtual Machines using Oracle VM or Vagrant in the past. Docker operates on a similar principle but with its own set of advantages (which we'll get into later).
With Docker, you choose an image (consider Docker images as blueprints) and download it. Then, you spin up an instance of that image, known as a container, which is quite akin to a Virtual Machine.
Image
A package or template used to create one or more containers.
Container
Instances of an image, isolated from each other, with their own environment.
But let's see it in action. This is a docker image code:
FROM ubuntu:23.04 RUN apt-get update RUN apt-get install -y curl nginx
Think of a Docker image as a recipe. This particular recipe instructs Docker to fetch Ubuntu 23.04, update the system, and install curl along with nginx.
Though brief, this Docker image exemplifies the essence of Docker.
Using this image, we can spawn a container (akin to a Virtual Machine) that will set up a Linux Ubuntu environment, already updated and equipped with curl and nginx.
This ensures uniformity across all developers in our company, as everyone uses the identical image, guaranteeing the same programs, packages, and versions are installed. The days of "But it works on my computer!" are over; now, every machine conforms to the same standards.
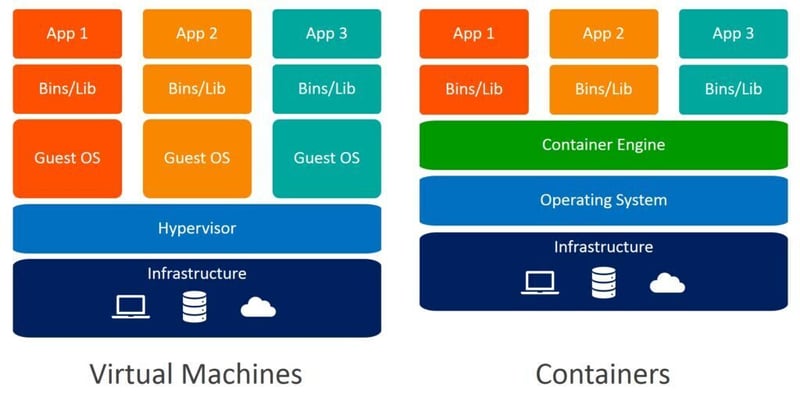
Docker vs Virtual Machines
If Docker essentially creates a container that resembles a virtual machine, why not just use virtual machines?
Well, Docker containers offer a more efficient alternative to virtual machines. They are lightweight and fast because they share the host system's kernel, rather than needing a full operating system for each instance. This means a Docker container can start up in just a few seconds!
One significant advantage of Docker and its containers is this:
Consider you're developing with NodeJS version 21.1: You can craft a Docker image, starting with an Ubuntu base, update it, add all the NodeJS essentials, and share this image with your development team.
Typically, you'd have to upload your NodeJS app, deploy it on a server, and ensure all dependencies are met and versions match.
But with Docker, you sidestep these concerns. Create your image, deploy it to any Docker-compatible server, and you're done.
The beauty of Docker is its indifference to the server's OS, installed packages, or your app's programming language. It just runs your image, no questions asked.
To underscore the point: Server specifics become irrelevant. Just upload and run your Docker image, and that's the entirety of the deployment process.
Installation
You can install Docker Desktop, a GUI Docker app, but we, rugged and tough developers use proper terminal stuff, so you will install Docker Engine, the terminal version of Docker.
Jokes aside, you can install whatever you want: Docker Desktop or Docker Engine, just make sure you are following your OS's instructions. For example, for Debian-based distros such as Ubuntu:
Uninstall previous Docker versions
sudo apt-get purge docker-ce docker-ce-cli containerd.io docker-buildx-plugin docker-compose-plugin docker-ce-rootless-extras sudo rm -rf /var/lib/docker sudo rm -rf /var/lib/containerd
Install Dockercurl -fsSL https://get.docker.com -o get-docker.sh sudo sh ./get-docker.sh
Check that Docker is installedsudo docker version
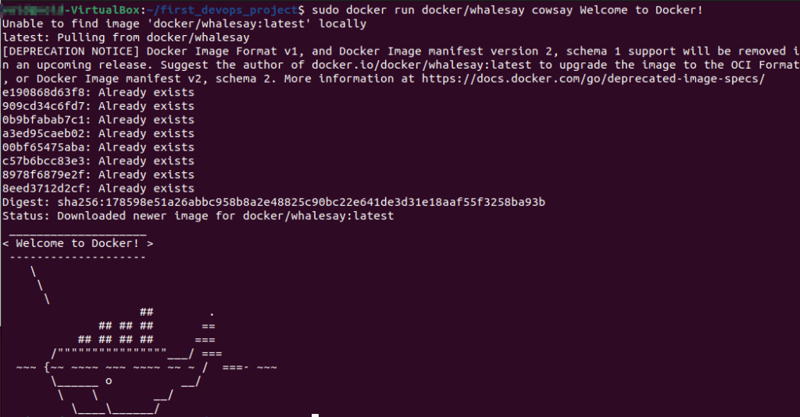
Let's run a test. Run the following command in your terminal:
sudo docker run docker/whalesay cowsay boo
Important: Every Docker command needs sudo permission. You can add a user to the docker group, but despite that, it still keeps asking for sudo permission. I have found that by running the command sudo chmod 666 /var/run/docker.sock , you don't get asked for sudo permissions any more (You can use a similar command, like chmod +x).
Basic commands
We have Docker up and running. Let's see a few basic commands. Your bread and butter if you want:
List all imagesdocker images
Download or execute a container from an imagedocker run <IMAGE_NAME>
Download a specific versiondocker run <IMAGE_NAME>:<VERSION>
Execute a container in the backgrounddocker run -d <IMAGE_NAME>
Bring a container from the background to the foregrounddocker run attach <ID>
Execute a commanddocker run ubuntu cat /etc/*release* docker run ubuntu sleep 15
Download an image to run it laterdocker pull <IMAGE_NAME>
Execute a command inside the docker containerdocker exec <COMMAND>
Connect to the container's bashdocker run -it <IMAGE_NAME> bash
List all running containersdocker ps
List ALL containers, running or notdocker ps -a
Run a container with a link to other container:docker run -p <PORT_LOCAL>:<PORT_DEFAULT> --link <IMAGE_NAME_TO_LINK>:<IMAGE_NAME_TO_LINK> <IMAGE_NAME> docker run -p 5000:80 --link redis:redis voting-app
Get details from an image or container in JSON formatdocker inspect <NAME_OR_ID>
Get logs from a container running in the backgrounddocker logs <NAME_OR_ID>
Get all the layers from an imagedocker history <IMAGE_NAME>
Stop a containerdocker stop <IMAGE_NAME_OR_ID>
Remove permanently a containerdocker rm <IMAGE_NAME_OR_ID>
Remove permanently an image that isn't being useddocker rmi <IMAGE_NAME>
Build an image from a Dockerfiledocker build . -t <NAME>
Environment variablesdocker run -e <VARIABLE>=<VALUE> <IMAGE_NAME> docker run -e APP_COLOR=blue simple-webapp-color
An example: Jenkins container
Let's use a real-life example: Using a Jenkins container.
In future posts, I will talk more in-depth about Jenkins and what it does, but Jenkins is a great DevOps CI/CD tool. Let's download Jenkins and run it on our computer:
docker run jenkins/jenkins # This downloads and runs jenkins docker ps # Get the container ID and port docker inspect <CONTAINER_ID> # Get the container IP
Open a Browser in your VM using :docker run -p 8080:8080 jenkins/jenkins # Map the port
Open a Browser in your Host machine using :
Here, we are installing and downloading a Docker image in our Ubuntu Virtual Machine and running it. We can view Jenkins in our VM by opening a Browser and using the Docker container's IP and port, but by mapping the port we can open Jenkins in our Host computer.
The structure is:
Host with Windows -> Linux VM -> Docker container running in Linux
Now, Linux is running a lightweight Docker container we can access from our Windows machine. Isn't that great?
Data persistence
We stop the Jenkins container and the next day we resume it to keep working. But we have lost everything. What happened????
Docker alone doesn't have data permanence.
The container uses its own folders (/var/jenkins_home on Jenkins, /var/lib/mysql on MySQL, etc), but when you stop the container and run the image again, you are creating a container from scratch. What can we do about it?
We can achieve Data persistence by linking a folder in the OS running Docker, and the container's folder.
mkdir my_jenkins_data docker run -p 8080:8080 -v /home/<USERNAME>/my_jenkins_data:/var/jenkins_home jenkins/jenkins
Here, we created a folder called my_jenkins_data and we linked it with the Jenkins folder /var/jenkins_home, where Docker stores any change.
So, if we run the command again, we will create a new container, linking the stored information, as if we were resuming our container.
Data permanence with volumes
We can simplify this process. Instead of giving a long string for our folder, we can let Docker manage the volumes by creating them in /var/lib/docker/volumes/*.
Create a volumedocker volume create test_volume
This creates a volume in /var/lib/docker/volumes/test_volumedocker run -v test_volume:var/lib/mysql mysql
We can also use the modern way, which is longer but more declarative and verbose:docker run / --mount type=bind, source=/data/mysql, target=/var/lib/mysql mysql
Final thoughts
Docker shines for many compelling reasons:
Isolation: It ensures applications are insulated from the system, guaranteeing uniformity across various settings.
Efficiency: By leveraging containerization, Docker enhances resource use, leading to greater system efficiency.
Portability: Containers can be executed on any system with Docker, simplifying application deployment in diverse settings.
Scalability: Docker facilitates easy scaling of applications by adjusting container numbers based on demand.
Consistency: It maintains uniformity across development, testing, and production, mitigating the "it works on my machine" issue.
Ecosystem: Docker boasts a robust ecosystem filled with an array of tools and services that enhance containerization, offering a flexible platform for deploying and managing applications.
Deployment: Docker streamlines and secures deployment processes. Rather than juggling packages and versions, we simply transfer our Docker image to a server.


